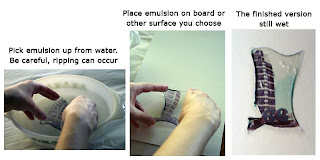
So, as promised, here are some step - by - step instructions on making an emulsion lift.
First, you will need a Polaroid 669 photograph. I used an image I shot of The Price Tower
in Bartlesville, OK designed by Frank Lloyd Wright (one of my fave architects.) Once developed,
it's best to let it sit for 24 hours before making it into an emulsion lift. This allows the emulsion to
settle and fully develop.
Second, you will need very hot water ( I use a coffee pot), tongs, cold water, paper or board or other surface to place emulsion lift on, a container for the hot and cold water (I use an old casserole dish I found
at a flea market. Since chemicals will be floating around it's best not to use something that's "nice" or that
you will ever eat out of.)
When you have your Polaroid, it's time to get the hot water ready. Using a coffee pot
is quick and easy. Pour into your hot water container. Place the 669 Polaroid in the water.
Let it sit for about 4 minutes. Using the tongs, transport photo from hot water into the cold
water.
While image is in cold water, start scraping the emulsion off from the backing. I just use my finger nail. It
shouldn't take too much effort to get the emulsion off. Be sure to be careful not to get holes or rips which
happens quite often. The emulsion will float in the water once it's completely off backing.
Note: there will be clear slimy stuff, try to get this off as much as possible
Now, here comes the tricky part, getting the emulsion onto the paper ( or in this case the Crescent board.)
Using fingers, spread emulsion out flat as much as possible. This will probably take several attempts. Place it carefully on the board. You will be able to move the emulsion around to a certain degree. Once you are
satisfied with it, let it sit to dry.
Voila! Your very own emulsion lift. With this particular piece, I will be adding old, antique cut nails (like the
ones in Old Mill '66.) I just have to find them now which is no easy task.
Note: this is not the only way to make emulsion lifts, this is how I do it.
you can search on the internet for other ways
I will explain how to do a Polaroid Transfer in my next step - by - step blog. One difference is using the negative to create the image.


No comments:
Post a Comment